Before starting the process you have to kepp in mind the following information:
Batch ID is unique and need to be used different each time.
The item cannot have open Sales Order and Work Order.
The item status only can change to "Inactive" (due to Template limitations)
Batch updates cannot be updated too much at a time, and the system request can be stuck.
Now let's start.
1. Open the "ItemImportTemplate" file.

2. Go to "EGP_SYSTEM_ITEMS_INTERFACE" tab.

3. "Transaction Type" column value is "UPDATE". Is not necessary to change it.

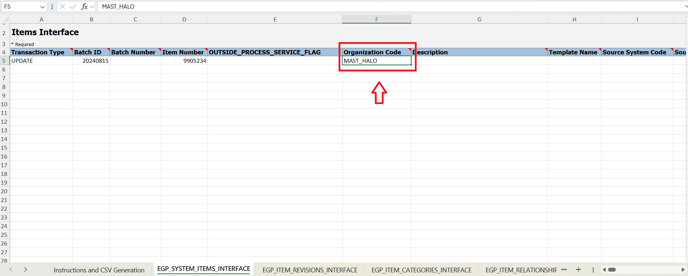
4. In "Batch ID" column you will have to input the corresponding information.

5. Then, input the item number in the corresponding column.

6. In "Organization Code" column the default value will be "MAST_HALO". Is not necessary to change it.
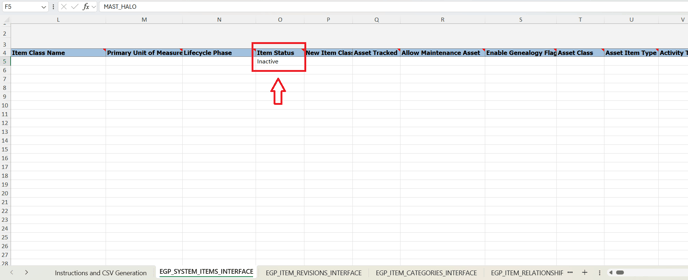
7. As in the previous column in this column "Item Status" will be a default value that you don't need to change. Value is "Inactive".
8. "Costing Enabled" and "Inventory Asset Value" columns have "Y" value.

9. "Inventory Item" column also has "Y" value.

10. "Customer Orders Enabled" also has "Y" value.

11. "Back to Back Enabled" column also has "Y" value.

12. "Customer Ordered" column also has "Y" value.

13. After checking all the previous fields click on "save" icon and then on "Instructions and CSV Generation" tab.

14. Then, click on "Generate CSV File".

15. Input the name and click on "save" or "Guardar".

16. Now go to Oracle dashboard. Go to Tools -> Scheduled Processes.

17. Click on "Schedule New Process".

18. Click on the more options icon and then on "search".

19. Click again on "search".

20. Input "Load Interface File for Import" and after that click on "search".

21. Select the option and click on "Ok".

22. It will deploy a new window. Click on more options icon and then on "search".

23. Input "Item Import" and then click on "search".

24. Select the option and click on "Ok".

25. Select again the more options icon and after that click on "Upload a new file".

26. Click on "select file" or "seleccionar archivo":

27. It will deploy a new window. Select the ZIP file and click on "open" or "abrir".

28. File will be loaded. Click on "Ok".

29. As the information now is complete so click on "Submit".

30. It will be showed the "Process ID". Click on "Ok".

31. Wait until the process is completed.

32. Now go again to "Schedule New Process".

33. Follow the same route:

34. Now search for "Item Import".

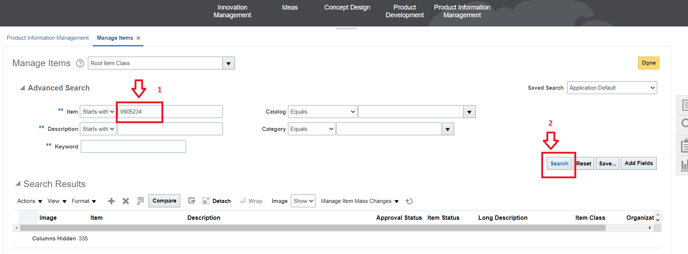
35. Select the option and click on "Ok".

36. Click again on "Ok".

37. Input the Batch ID and then click on "Submit".

38. Wait until the process has "Succeded" status.

39. After that go to Product Management -> Product Information Management.

40. Click on tasks icons and after that on "Manage Items" option.

41. You can check only for some items if the status is already inactive.
42. For example, this item has already inactive status.
